Just in time to celebrate Unglued Fargo’s 3rd Birthday, we have a really rad DIY (or two!) for your next party. Here at Unglued, we really love EVERYTHING gold, bunting, dinosaurs, marshmallows, and we still can’t get out of the s’more kick! So here are all of our favorites combined into one crafty Party Setup!
DIY Bunting Cake Topper
Supplies Needed:
3 sheets of scrapbooking paper
2 wooden skewers
twine
plain paper
pencil
scissors
glue gun

Start off by drawing a triangle template.
Cut out the triangle template and trace it onto the backside of each scrapbooking paper. Trace as many as you will need. Cut each piece out and set aside. Cut two pieces of twine, one slightly shorter than the other. Placing a small dot of hot glue at the top of the skewer, wrap the twine around the skewer a few times. Do this for both ends of each piece of twine. You can adjust the lengths by how many times you wrap the twine around the skewer.

Now, you will attach the triangles. Fold the triangles in half so the pointy ends match exactly. Add a touch of glue at the crease and also at the tips in order to close the piece together.

However you place the paper on the twine is how it will hang, so make sure that you keep things flat and in line, so your bunting doesn’t go in different direction or hang funny. Repeat this with each triangle. It is good to lay out your triangles ahead of time to know your spacing before you glue them down. Lay them with even spacing and alternate the papers.

Now this simple little décor is ready to be used and can fancy up just a simple cake, cheesecake, or pie! It has a bit of a rustic feel, great for the fall season around the corner! ADORABLE. For a cool birthday, pair it with the DIY Animals below.
DIY Animal Candle Holders
Supplies Needed: rubber/plastic animals (I bought a container at Wal-Mart and a few bigger ones from the local party store, but they can be found at Target, Hobby Lobby, etc.)
Wilton candles that come with the plastic holders on the bottom
hammer & nail
gold spray paint

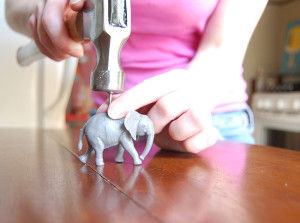
Take your rubber animal and center your nail on its back. Hammer down until you make a hole deep enough in order to fit your plastic holder into. (Choose animals that are big enough to carefully do this. Animals that have more of a flat back tend to work better). You can also use a drill for this step. If you are skilled with or own a drill, this could be easier because some of the animals are VERY hard. I found that to bend the animal’s legs and smoosh its body to your hard surface, helps you to nail those with flimsy legs. Then, the legs just bend right back!

Insert plastic holder.

Spray paint gold. This may take a few coats to get it super gold and shiny.

TADA! Some rad little décor!
Now you can have a really fun birthday party for kids, or these things are so stinkin cool… they are great for your funky adult shindig!

Commentaires